DISCLAIMER: It appears that this blog with words and pictures has a mind of it's own. And for now it is smarter than me so IT will determine what goes where. Therefore, it may be a little wacko-looking.
Sorry for any disruption this my cause to your eyes and brain or your shopping excursions.
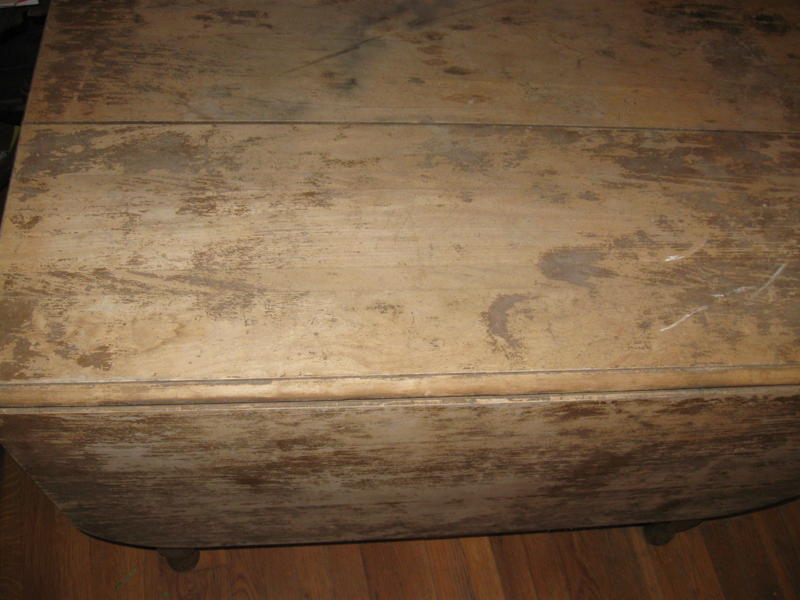
Here is the 'before' picture of the dining room table I blogged about on the 3/9/10 post.

I used an orbital sander with 60 grit Velcro sandpaper to sand the top.
(The lower the number of the sandpaper, the more coarse it is.)


Everyone begin... Neck
stretches. To the right.
1, 2, 3...Hold. (Keep your
eyes open!) Relax. Back
to an upright position.
Sorry but remember I am
a beginner.
I do not know how to turn a picture yet.
The finish was quite old and worn and came off very easily. I love that! It makes my job much faster and easier.
I sanded the edges of the table by hand cutting small pieces of sandpaper out of a big sheet of sandpaper. (It sharpens your scissors too!) (Although that doesn't look like a sharp-scissor cut does it?) I used 100 grit paper.


I only use gloves to
protect my hands if
I will be going to the
Grand Ball. It hasn't
happened yet. Either using gloves OR the Ball.
I can be a perfectionist, but on pieces such as this, I leave a little finish here and there in the crevices and don't worry about it. You can call it being lazy. I call it preserving character. (It also symbolizes the imperfections we all have. Yes, I did say ALL of us!)


Now I want you to look closely at this stain on the top. It is a black stain (probably mold or rust or both) that I could not sand off. It was a wrench outline and something else. If you talk to an expert or just some determined re-finisher, there is probably some product or technique for removing it. I chose not to have that conversation. Besides, I was preserving the tables past and my patience. So I just left it like it looks.

That 'reasoning' made it impossible to stain it the natural maple color that the table is. Because the stains would show through the finish. (I don't really know my woods that well, there just happened to be a stamp underneath the table that said SOLID MAPLE.)


I had some American Walnut stain which almost looked black. I also LOVE the fact that it is water-based for easy cleanup! I put it on pretty heavy and the outline of the wrench was still visible but not too bad. (That character thing again.)


I then sparsely sanded
underneath not
worrying that some
finish was left on. I used
flat black paint underneath.
Here are a close-up of the feet. I do something that drives my
sister crazy. After I paint and stain it, I go back and lightly sand the edges to scuff them up.
I don't have a good explanation except that I like the finished look. It also makes it forgiving of any scrapes that might happen from normal wear and tear.


Flat paint does not have a very becoming look at first, but I like the end result.
It makes it easier to accept stain over the paint.
I did not like that the Walnut stain had a gray look when it dried so I re-stained over everything with maple finish.


Now stretch your neck again.
(It really bothers me to have
sideways picture on one hand
and makes me impressed that
I could stand on my head and
click on the other hand!?)
The picture on the right shows
the leg in the process of being
stained. This part always excites
me. (I know, I need a social life!)

I finished the table off with a rub-on clear satin polyurethane. I gave it two coats with a light sanding in between coats using 220 grit sandpaper. (Very fine paper.) The wiping of the finish eliminates brush marks, which I refuse to include in 'character building'.)

 Neck stretch to the
 left. (I did use gloves
for this part. But still no
Grand Ball or even Disco
invite for that matter!)
Ta Da!
Bottom Top


BEFORE AFTER


I took the table to a furniture store where it just happened to sell in forty-five minutes!
How's that for imperfections!
"I cling to my imperfection, as the very essence of my being."~Anatole France
"You see, when weaving a blanket, an Indian woman leaves a flaw in the weaving of that blanket to let the soul out."~Martha Graham
That work is amazing!! You did such a great job. And I agree, the character is in the flaws and imperfections. We all have them :)
ReplyDeleteThanks so much for commenting on my blog because now I get to enjoy reading yours!!
LOVE the new look!
ReplyDeletestill doing great things with furniture, looks wonderful
ReplyDelete